You need to generate the .csr file: the request for the certificate.
Create csr
1.In the Windows start menu, type ‘Internet Information Services (IIS) Manager’ and open it.
2. In Internet Information Services (IIS) Manager, in the Connections menu tree (left pane), locate and click the server name. On the server name Home page (center pane), in the IIS section, double-click Server Certificates.

3. On the Server Certificates page (center pane), in the Actions menu (right pane), click the Create Certificate Request link.

4. In the Request Certificate wizard, on the Distinguished Name Properties page, provide the information specified below and then click Next:
| Common name: | Type the fully-qualified domain name (FQDN) (e.g., rilheva.com) |
| Organization: | Type your company’s legally registered name (e.g., Xeo4 S.r.l..). |
| Organizational unit: | The name of your department within the organization. Frequently this entry will be listed as “IT”, “Web Security,” or is simply left blank |
| City/locality: | Type the city where your company is legally located (e.g., Piacenza) |
| State/province: | Type the state/province where your company is legally located (e.g., PC) |
| Country: | In the drop-down list, select the country where your company is legally located |

5. On the Cryptographic Service Provider Properties page, provide the information below and then click Next.
Cryptographic:
In the drop-down list, select Microsoft RSA SChannel Cryptographic Provider
Bit length:
In the drop-down list select 2048, unless you have a specific reason or opting for larger bit length. (e.g., https://store.ssl2buy.com)

6. Choose a name for the file that will be generated and then passed to the portal for issuing certificates.
Certificate creation on the Authority Portal
7. Use a text editor (such as Notepad) to open the file. Then, copy the text, including the —–BEGIN NEW CERTIFICATE REQUEST—– and —–END NEW CERTIFICATE REQUEST—– tags, and paste it into the order form.
8. You are now ready to order your SSL certificate.
Confirm certificate on IIS
9. Upon receipt of the file (e.g. .cer, .crt) in the IIS section, on the Server Certificates page (center pane), in the Actions menu (right pane), click the Complete Certificate Request link.

10. In the Complete Certificate Request wizard, on the Specify Certificate Authority Response page, upload the file in the wizard proposed by the IIS, name it and click OK.

Export certificate from Windows to .pfx file
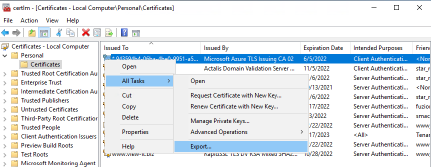
11. Now you need to extract the certificate, search for ‘Manage computer certificates’ in the Windows Search.

12. Go to Certificates in the left menu → Personal → Certificates.

13. Select the certificate to export, right click → All Tasks → Export.
14. In the wizard select the option: ‘Yes, export the private key’.

15. Type the password (it is necessary for the use of the generated file).

16. Type the password (it is necessary for the use of the generated file).

17. Choose the file name and save.
18. Now we have a .pfx file that contains everything you need and if necessary you can extract all the parts. Send it to support@rilheva.com.
Was this helpful?
0 / 0